Electrical tools
Which marine wiring tools do you actually need?
Quick answer
A boat wiring kit needs three tools: a ratchet crimper sized to your terminals, a heavy lug crimper for battery cable, and a meter that reads current. A ratchet crimper will not release until the crimp is fully formed, which removes the single most common failure in a homemade harness.
Marine wiring is not house wiring. Everything on a boat is damp, moving, vibrating and often ungrounded, and a connection that would last decades behind a wall stud can fail from the inside in a single season on open water. The two tools that decide whether a boat rewire holds are a crimper that actually forms the crimp it claims to and a meter that tells you what a circuit is doing rather than what you assume it is doing.
A ratchet crimper will not release until the crimp is fully formed, which removes the single most common failure in a homemade harness: a terminal that looks crimped but pulls free the first time somebody yanks the cable. A clamp meter reads current without breaking the circuit, which is the only practical way to find out what a trolling motor actually draws instead of guessing from its rated thrust.
Every tool below was researched against its own published specifications and checked against verified owner reviews. Nobody here ran a season of boat rewires to produce this list. Where a manufacturer does not publish a figure, this page says so instead of estimating one.
On this page
- What makes a marine crimp different from an automotive one?
- How do published AWG ranges compare across crimping tools?
- Why does a clamp meter matter for a trolling motor?
- Beginner: get a working harness for under sixty dollars
- Intermediate: do the job once and stop thinking about it
- Expert: chasing the last volt
- The connectors and cable that finish the job
- How we chose these tools
What makes a marine crimp different from an automotive one?
A marine crimp has to survive vibration, salt spray and a damp bilge for years without the barrel corroding from the inside out. Tinned, finely stranded marine cable resists that corrosion in a way plain automotive copper wire cannot, and the fitting over the wire matters just as much as the wire itself. Adhesive lined heat shrink over a tinned barrel is what actually keeps water out of a joint. Tape and a bare crimp left exposed under a console do not.
The tool doing the crimping decides whether that seal ever gets the chance to work. A ratchet mechanism will not open until the jaws have travelled through a full cycle, so a rushed half crimp is mechanically impossible with the right tool. Pliers, a hardware store crimper with no ratchet, or a multi tool crimping notch will all let you stop early, and a crimp that looks closed but was never fully formed is the single most common point of failure this catalog runs into in owner reports of cheap wiring kits.
How do published AWG ranges compare across crimping tools?
Every crimper on this page states its own AWG range on the manufacturer listing, and the ranges do not overlap the way you might expect. Matching the tool to the terminal in your hand matters more than buying the one with the biggest catalog reputation.
The three crimpers on this page span from 22 gauge signal wire up to 2 gauge battery cable, with no single tool covering the whole range.
Published figure A published engineering, regulatory or manufacturer figure. It does not change because somebody disagrees with it.
| Tool | Published AWG range | Terminal type |
|---|---|---|
| Klein 3005CR | 10 to 22 AWG | Insulated terminals |
| Ancor 703010 | 8 to 22 AWG | Heat shrink insulated terminals |
| IWISS AP-50BI | 2 to 8 AWG | Battery cable lugs |
AWG ranges come from each tool's own manufacturer listing. Buy the tool that matches the terminal you are actually crimping rather than the one that claims to do everything.
Why does a clamp meter matter for a trolling motor?
A clamp meter reads current by measuring the magnetic field around a single conductor, so you clip it around one wire and read a number without cutting into the circuit. That makes it the only practical way to find out what a trolling motor actually draws on your own boat, at your own battery voltage, instead of relying on a nameplate figure that assumes ideal conditions.
The catch is that a lot of inexpensive clamp meters read AC current only. The Klein CL120 measures AC current through its clamp jaw and AC or DC voltage through its leads, so check the DC current range specifically before buying a clamp meter if measuring trolling motor draw is the actual reason you want one. A meter that cannot clamp DC current will read zero on a 12 or 24 volt motor circuit no matter how hard the motor is working, which tells you nothing about the load you were trying to measure.
Beginner: get a working harness for under sixty dollars
A first rewire does not need a professional tool chest. It needs one crimper that ratchets properly and one meter that reads a battery, a fuse and a continuity check without complaint.

Klein Tools 3005CR ratcheting wire crimper, 10 to 22 AWG
$34.96A ratcheting crimper from an actual tool company, sized for the small terminals that make up most of a boat harness.
Best for: A first proper rewire of lights, a bilge pump and a fish finder
Check price on Amazon
AstroAI true RMS 6000 count auto-ranging multimeter
$34.99Enough meter to check battery voltage, continuity and a rough voltage drop without spending Fluke money.
Best for: Keeping one meter in the boat for the whole season
Check price on AmazonIntermediate: do the job once and stop thinking about it
This is the point where a ratchet crimper earns its price and a clamp meter starts answering real questions about actual current draw instead of estimates from a spec sheet.

Ancor Marine Grade single crimp ratchet tool
$70.13Will not fully open until the crimp is fully formed, which is the reference marine brand's whole reason for existing.
Best for: Anyone doing more than one connection properly this season
Check price on Amazon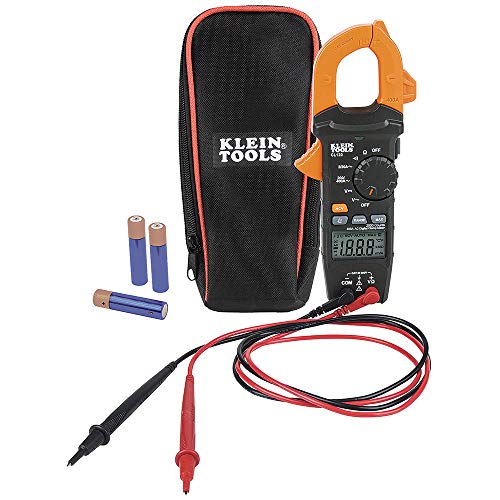
Klein Tools CL120 digital clamp meter, 400A AC
$64.98Reads current without breaking the circuit, and is the only practical way to measure real trolling motor draw.
Check before buying: Check the DC current range before buying if measuring trolling motor draw is the reason you are buying it. Many clamp meters read AC current only.
Best for: Finding out what a motor actually pulls instead of estimating it
Check price on AmazonExpert: chasing the last volt
A heavy lug crimper and a lab grade meter are for the owner who wants to chase a voltage drop problem seriously, not for a boat that gets checked twice a season.

iCrimp AP-50BI battery cable lug crimper, 8 to 2 AWG
$28.59Battery cable lugs need a hex crimp from a completely different tool than terminal crimpers use, and this is the affordable way to get one.
Best for: Making up your own trolling motor battery cables
Check price on Amazon
Fluke 15B+ digital multimeter
$117.76CAT III rated and accurate enough to still be trusted after a decade of use.
Best for: Chasing a voltage drop problem down to its actual source
Check price on AmazonWho should not buy this tier: Anyone who checks a battery twice a season with a twenty dollar meter, where the Fluke's extra accuracy and price go mostly unused.
The connectors and cable that finish the job

End Game 6 gauge marine battery cable, USCG and ABYC compliant
$22.99The only cable in the catalog whose own listing states USCG and ABYC compliance rather than the phrase marine grade alone.
Check before buying: Size the gauge by the voltage drop over your own run length before ordering. Six gauge is not automatically right.
Best for: A trolling motor feed you want to do once and not think about
Check price on Amazon
haisstronica heat shrink butt connectors, 330 piece, 26 to 10 AWG
$23.79Adhesive lined heat shrink in the full range of sizes, which covers nearly every joint on a small boat.
Check price on Amazon
TICONN heat shrink marine crimp ring terminal kit, 120 piece
$9.99Ring terminals rather than spades, because a ring cannot vibrate loose off a stud the way a spade can.
Check price on AmazonHow we chose these tools
We compared manufacturer published specifications for AWG range, terminal type and current rating against verified owner reviews, and checked each brand against ABYC E-11 guidance on marine wiring practice. Nobody on this page ran a boat rewire in a lab to produce this list. Where a spec was not published, we said so instead of estimating one.
How we chose
We did not test this equipment in person and we never claim to. Picks are researched from manufacturer specification sheets, published engineering and regulatory figures, and the recurring themes in verified owner reviews. Every pick is matched to a real thrust rating, a real published amp draw, a real capacity or a real conductor size rather than to a price bracket, and it is placed in the tier where its published capability actually belongs. We rejected the unbranded flood that dominates several of these search results, because a lithium pack whose management board is the only thing between a cell fault and a fire, a breaker protecting a battery cable, a life jacket and a bracket holding a two thousand dollar motor to the bow at highway speed are all parts whose failure has a consequence nobody can walk away from. Where a figure is convention rather than a published standard we label it that way, and where a manufacturer does not publish a figure we leave it out instead of estimating it.
Sources
- ABYC E-11 AC and DC Electrical Systems on Boats, referenced for overcurrent protection placement and conductor guidance
Frequently asked questions
Why do I need a ratchet crimper instead of ordinary pliers?
Ordinary pliers or a non ratcheting crimper let you stop squeezing before the crimp is fully formed, which produces a terminal that looks attached but pulls off the wire under load. A ratchet mechanism will not release until the jaws complete a full cycle, so a half finished crimp becomes mechanically impossible. That single difference is behind most of the loose connection complaints in owner reviews of cheaper crimping tools.
What is the actual difference between a butt connector and a ring terminal?
A butt connector joins two wire ends inline and relies entirely on the crimp and the surrounding insulation to stay put. A ring terminal bolts to a stud, so vibration cannot walk it off the connection the way it can lift a spade terminal from a screw. Use ring terminals on anything bolted to a switch, block or battery post, and reserve butt connectors for inline splices away from any bolted joint.
Can I use automotive wire instead of marine cable on a boat?
Automotive wire uses plain copper strands that corrode from the inside once moisture works past the insulation, and a boat is a damp, vibrating environment that finds that moisture faster than a car engine bay does. Tinned, finely stranded marine cable resists that corrosion and flexes without work hardening. The price difference is small compared with pulling a corroded harness back out of a hull two seasons later.
How do I know what wire gauge to run to my trolling motor?
Wire gauge on a boat is sized by voltage drop over the actual run length, not by a single ampacity number tied to gauge alone, because ABYC E-11 ampacity depends on the insulation rating, engine space location and how many conductors are bundled together. Measure the run length from battery to motor, then size the gauge with a voltage drop calculator rather than guessing from a chart that only lists gauge.
Does a clamp meter read DC current?
Not always. Many inexpensive clamp meters measure AC current only through the clamp jaw and switch to test leads for DC voltage, which will read zero current on a 12 or 24 volt trolling motor circuit no matter how hard the motor is working. Check the specific DC current range on the listing before buying a clamp meter if measuring real motor draw is the reason you want one.
Where should the fuse or circuit breaker go on the battery positive cable?
ABYC E-11 calls for overcurrent protection within 7 inches of the battery positive terminal, extended to 40 inches if the cable runs inside a protective sheath. Everything between the battery post and that fuse or breaker is unprotected cable capable of carrying full battery current into a fault, so mount the protection as close to the battery as the installation physically allows.
Get the complete rigging shopping list
Every item in the beginner, intermediate and expert rigs for both a boat and a kayak, with running totals, in one printable list. No charge.
One list, no sequence of daily emails, and you can leave at any time.
Researched, not professional advice. This page is compiled from published engineering and regulatory figures, manufacturer specifications and owner-review consensus, not hands-on testing. Figures described as a rule of thumb are boating convention rather than published standards, and they are labelled that way wherever they appear. Marine electrical work is not house wiring. Use tinned, finely stranded marine cable, size it for voltage drop and for the ABYC E-11 ampacity table rather than one or the other, and put overcurrent protection within seven inches of the battery positive terminal, because everything between the post and the fuse is unprotected. A lithium battery needs a charger with a lithium profile. Never load a boat past its capacity plate, and remember that canoes and kayaks carry no federal capacity plate at all, so their stated capacity is the manufacturer own figure. Wear the life jacket, and treat early season water as the hazard it is: cold water immersion takes your breath and then your hands long before it takes your core.